html shadows
Reader Interactions
Html Borders and Shadow Styles
Do you want to apply beautiful HTML borders and shadows to your images and photos?
My Virtual Assistant will show you a step by step tutorial on how you can do this easily with or without HTML.
(My virtual assistant wrote this whole page.) 🙂
Beautiful borders and shadows can add a lot of value to your images on your blog or website.
Borders and Shadow Styles without Using HTML
or Click here to jump to the HTML borders method
Most blog owners are not professional graphic designer who can expertly use software like Photoshop.
And instead of using Photoshop for this purpose, I suggest an online picture editing tool “Picmonkey” that can help you create a very simple and compelling graphics or images to your website.
Picmonkey is a very simple and easy online picture editing tool in which anybody can edit their images in almost no time with it. The best part:
- you don’t need to install it on your PC
- most of the features are simple
- you don’t need a lot of training before using it.
However, if you need some initial training before using it, you can download the free copy of the user guide I have put together.
Let’s go back on how to apply borders and shadows to your images, please follow this step by step procedure:
- Go to the PicMonkey website, click on ‘Edit’ to upload an image

- Once the image is uploaded, on the left hand navigation, click on “Frames” to add borders and shadow styles to the image.

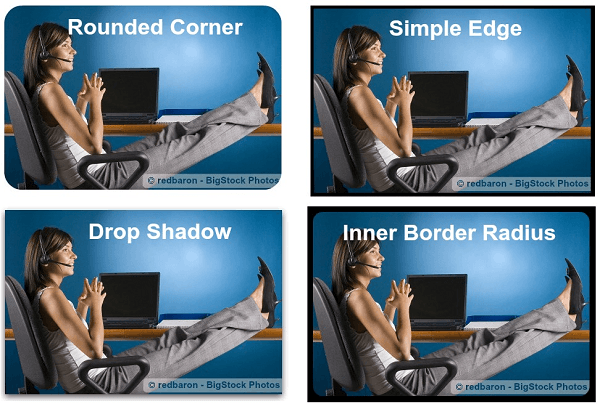
- In Picmonkey, you can use a lot of border and shadow styles such as rounded corners, simple edge, drop shadows etc.

HTML Borders and Shadow Styles
You might be thinking:
“Using picture borders and shadow styles with the help of HTML is very difficult and not possible for someone who doesn’t know HTML at all.”
Wrong!!!
Please excuse me for shouting.
I am going to teach you how you can add beautiful HTML borders and shadow styles in 5 minutes. Seriously, you can learn this craft in the next 5 minutes even if you haven’t heard of the term HTML ever before.
In fact, you will prefer using this method rather than the above mentioned PicMonkey for editing images in the future.
See the following image as an example:
How did I create these shadow effects?
By using a simple HTML code, you can copy the HTML code in the box below and use the same code after some minor changes.
Just click into the box and copy the HTML code
5 minutes Training to understand this HTML code
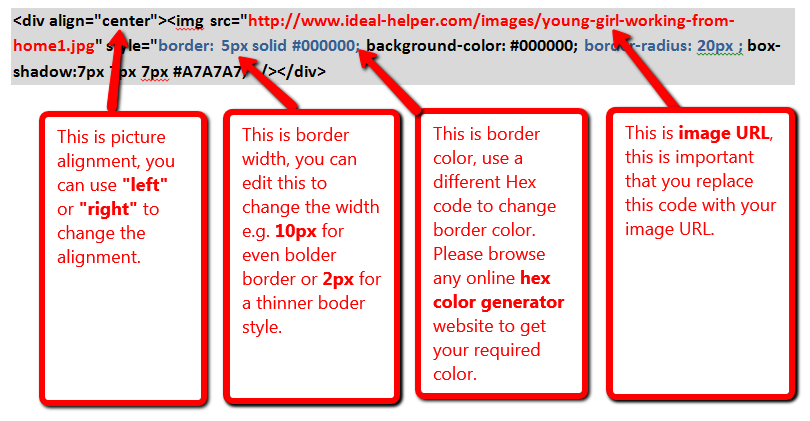
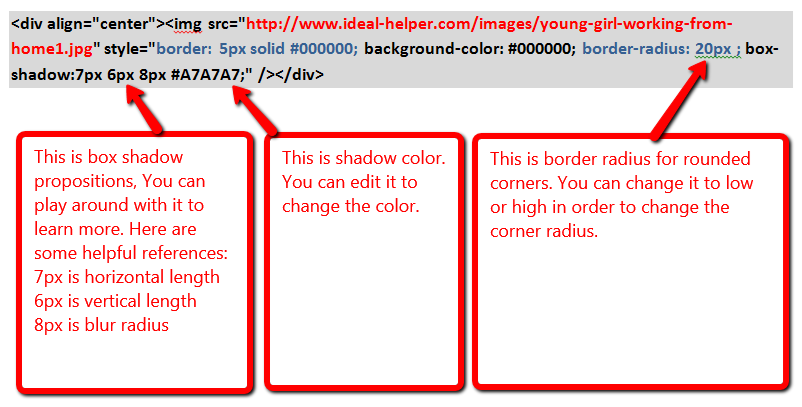
As I promised you earlier, you can learn this craft in just 5 minutes. So, please carefully review the images explained below in order to use this code effectively.
Image I:
Image II:
Hope this helps you give an idea on how you can add beautiful borders and shadows to your images.
However, feel free to ask me if you have further questions. I will try to reply on your queries as soon as possible in the comment box.
Also, if you like my post, I’d love it when you would like and share it with your friends via Facebook.


Leave a Reply